Showing posts with label fall decoration. Show all posts

Saturday, November 30, 2013

Fresh Christmas Colors Ideas from HGTV

Try something new this season! Decorate your home with haute holiday hues that are anything but conventional.

 By : Brian Patrick Flynn

Kelly Green + Baby Blue + White 
While kelly green is often paired with red for holiday flair, it works surprisingly well in a seasonal sense when paired with baby blue and white. The key to successfully using this color combination is the proper balance of white. With a strong white backdrop, such as a white tree or tablecloth, the color scheme often seen on beach blankets and sailboats can take on a wintry appearance.
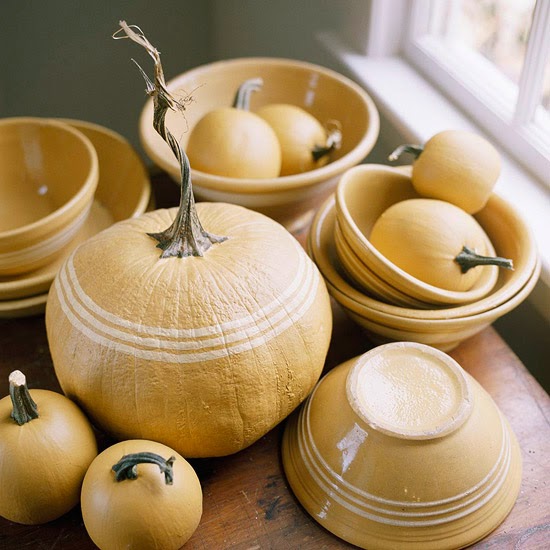
Green + Brown 
Colors seen together in nature always work well in decorating, so don't be afraid to take a cue from Mother Nature. This is especially true when pairing brown and green, two of the most-popular earth tones used in home decor. For sophisticated simplicity, try decorating a green tree using only brown ornaments. Consider using several different shades of green for a layered, multi-toned look when decorating walls and hallways.

Violet + Brown + Bronze + White 
Make it masculine! A color combination of violet, brown, bronze and white is a great way to add manly appeal to your home this holiday season. For proper balance, stick with brown and bronze as the dominant colors, with sprinkles of violet for accent, and set it all against a white tree.

White + Brown 
White and brown is simple, elegant and gender neutral. This combination is also incredibly versatile; add a few accents of blue or red to make it masculine, or add pink for a feminine touch.

Hot Pink + Lime Green + White + Red 
During the past few years, hot pink has become a haute hue for modernist holiday decor and is often paired with silver or gold. To add a little more Yuletide pop, pair hot pink with lime green, red and white.

Turquoise + White + Parchment 
Beige as an accent color? Yep! While turquoise is often paired with jewel tones and metallics in holiday decor, pairing the jewel tone with a muted, neutral tone such as parchment is much less expected. 
This is an excellent way for colorphobes to introduce more saturated hues into their holiday decor without being overwhelmed.


White + Gold 
Since the days when frankincense and myrrh were acceptable holiday gifts, gold has been commonly paired with silver and/or violet. To put a contemporary spin on this classic color, consider pairing gold with white. The juxtaposition of gold's warm undertones and white's coolness strikes the perfect balance.


Bubblegum Pink + Purple 
Bubblegum can be used for something other than a dentist's worst nightmare of a stocking stuffer. 
Lovers of retro and kitsch can put a regal spin on the nostalgic 1950s tone by using bubblegum pink as the dominant color toned down with the dark richness of purple.


Robin's-Egg Blue + Red + White 
Midcentury modernists can add vintage flair this holiday season with a color scheme of robin's-egg blue, red and white. In the 1950s, decorators paired robin's-egg blue with olive green and/or red orange. 
By pairing the hue with red and white, the beloved color takes on an entirely new identity as a contemporary holiday classic.


Teal + Red + White 
Thanks in part to candy canes and Kriss Kringle's wardrobe, red and white is one of the most iconic holiday color combinations; depending on how you pair it, though, the classic combo can be totally fresh and fun. Consider using teal as your dominant color this holiday season, with traces of red and white as accents.

Parchment + White 
Neutrals are a safe bet in interior design, and they can work just as well for holiday decorating. 
For understated elegance, consider pairing white with parchment. 
This less is more approach is timeless and easily adaptable.

Parchment + White 
Design tip: For greater dimension, throw a metallic into the mix whether it's silver, gold or bronze. 
The introduction of the metallic will help break up the tone on tone appeal and add layered depth to the overall color scheme.

2014 Thanksgiving Table Setting and Centerpiece Ideas


Designer Erinn Valencich shares tips for setting a Thanksgiving table that balances natural elements with the gleam of metallics.  

By H. Camille Smith


Add a Touch of Glitz

For a sophisticated but not over-the-top look, balance the sparkle of metallics with natural elements, like fall branches or fresh fruit. 
Erinn's Tip: Metallics add a great modern touch to a fall tablescape. Deep copper and bright bronze are a lovely additional to a traditional table. I prefer to bring in natural, textured elements like these seed-beaded placemats so the table doesn't get too glitzy.


Play With Scale

Diminutive pears contrast with elongated stemware for a look that is elegant and playful. 
Erinn's Tip: Slender amber stemware adds height and drama to a simple table while gold pillar candles and votives sparkle as the centerpiece. 

Opt for an Aromatic Centerpiece

Who said a centerpiece needed to time-consuming, expensive or even floral? Erinn created this arrangement by grouping scented candles with an earthy potpourri. 
Erinn's Tip: During the fall, natural elements are the best decorations. This potpourri creates a lovely centerpiece and its subtle fragrance is a great addition to the table. Look for large, chunky potpourris and add elements from your own backyard, like pinecones and seed pods, to the mix.


Gleaming Glass Accents

Golds and ambers pair beautifully with the traditional browns and oranges of fall.
  Erinn's Tip: Glass vases can be found very inexpensively in a variety of colors, shapes and sizes at your local housewares store. They're fantastic for adding a splash of luminescent color to the room. So go wild! Bring a bunch home, try them out and return what you don't use.

Simple Sophistication

This place setting layers basic elements to achieve an extraordinary effect. 
Erinn's Tip: A set of white plates is a great standard to have for your year round table. You don't have to get something special out just for the season. It's all in the presentation a crisp linen napkin folded into thirds and laid under a bronze glass plate topped with a miniature pear sets each guests' plate off with style for very little money, time or fuss. 

Bountiful Centerpiece

Set the stage for an unforgettable Thanksgiving feast with a centerpiece that exemplifies bounty. A ghost white pumpkin, chunky pillar candles and metallic painted gourds add sparkle. 
Erinn's Tip: Create a table that's casual and warm with a modern twist. Play with colors of chocolate, taupe and birch contrasted with crisp white.

Contrast Materials

A humble pinecone adds an organic touch to each place setting. 
Erinn's Tip: Have fun with materials; contrast ceramic with glass, wood and gleaming metal. Forgo the old standby tablecloth and opt for glamorous, polished silver chargers and chocolate-brown linen napkins.

Decorate the Whole Room

This buffet sparkles with candles and glassware in shades of amber and gold. Natural elements like wood grain candles and a rustic, hand-carved bowl filled with fall apples complete the look.  Erinn's Tip: "When decorating for Thanksgiving guests, don't stop at setting the table. The buffet, side tables and coffee table will benefit from a few fall touches as well. Bring in large branches of fall foliage and place in a tall vase for a seasonal decoration that is chic and free the best of both worlds. 


Thursday, October 24, 2013

Easy Painted Pumpkins : 2013 Halloween Decorations Ideas

This Halloween, create artistic pumpkins with paint, fun embellishments, and little (to no!) carving.
Get inspired by  this 2013 Halloween Decorations Ideas  ideas . I hope that you will find it useful for you ... Enjoy it !!


For a rustic look, paint a plaid pattern on a pumpkin. Use various colors and stripe widths.


Create a litter of kittens with painted pumpkins.
First, coat each pumpkin with matte finish sealant to dull the waxy surface.
Paint the pumpkins different colors, applying two or three coats of paint (let the paint dry between coats). Draw a nose, mouth, and whiskers on each pumpkin with a black felt tip marker.
For the eyes, draw eye shape outlines and eyelashes using the marker.
Paint the inside of the eyes white, let dry, then paint green irises outlined in black.
Cut out ear shapes from crafts foam, and hot-glue them in place.


To get this patterned look, draw a template for your design (or create it on a computer).
Trace the design onto contact paper, and cut out the interior of the design using fine tip scissors.
Adhere the stencil to the pumpkin.
Using a lightly paint coated stencil brush, apply paint with a bouncing motion.
Carefully remove the stencil and repeat as desired.


Grab the paintbrushes and get crafty with these designs that use pumpkins as canvases.
The simple graphic motifs, inspired by country decor, are a treat to display all autumn long.


This witch has rhythm! Tall pumpkins set the stage for this soft shoe scenario.
All you need to keep in step is black paint, ribbon, and shallow carving.


The painted sinister spider dangling on its luminous web warns visitors to beware.
The lines of the web are carved just deep enough to let the glow of the candle shine through the pumpkin wall.


Chisel windows in a painted mansion and carve a moon behind.
Candlelight from inside the pumpkin will bring the haunted scene to life.


Paint a pumpkin your favorite color for a stylish approach to Halloween decorating. Sprinkle the wet paint with glitter to add some sparkle to the color.


For a pumpkin that spans from Halloween to Thanksgiving, try a leaf motif. Find different types of leaves, trace the shapes on the pumpkin, and paint.


Add color and texture to your pumpkins with graphic stripes.
First, paint the entire pumpkin black.
When dry, create a design by scraping off the black paint to reveal the orange pumpkin rind beneath.
To use the painted pumpkin as a vase, carve out a narrow hole in the center to fit an existing vase.
Insert vase into the hole, then add flowers.


When summer fades to autumn and songbirds start to fly south, a birdbath becomes a perfect perch for a pumpkin adorned with a macabre silhouette.
Choose any number of eerie shapes for your outdoor display: think crow, black cat, bat, witch, or spider. Apply a coat of varnish after the paint dries to protect the pumpkin from the elements.
Tufts of garden moss help keep the pumpkin stable on its perch.


Play a game of cat and mouse this Halloween with this set of silhouettes.
Download our free templates, then trace the cat onto a large pumpkin and the mice onto three smaller pumpkins.
Fill in the outlines with black paint, or use a paint pen for a quick and easy alternative.
Go to the next slide to see another silhouette creature.


To create this patchwork design, paint your pumpkin with latex primer and let dry.
Then apply a base coat with cream color latex paint and allow to dry.
Mark off squares with masking tape, or download our free pattern below.
Paint an overcoat of khaki color latex paint; let dry.
Remove tape to expose cream color paint.


Use paper doilies as stencils to create intricate, lacelike designs.


Take miniature pumpkins to bewitching new heights with an aerial display.
Draw bats on white pumpkins with a permanent marker.
Cut a length of thick jute and knot one end to a large washer.
Tie a loop in the other end.
Punch holes in the top and bottom of the pumpkin, and use wire to pull the twine through the holes. (The washer supports the pumpkin's weight, and the loop attaches to the shepherd's hook.)


Like any culinary confection, this tiered treat has all the right ingredients. Select two pumpkins and a Cinderella squash that stack easily. "Ice" the pumpkins and squash in pretty pastel paints, embellish with lacy trims and adhesive gems, and stack.


A black cat and a bat this painted pumpkin duo is "spooktacular"! Spray paint two pumpkins luscious matte black. Craft cardstock features, and pin in place. We carved the cat and bat faces, but you can cut them from cardstock, too.


Too big to pop in your mouth, these candy corn look painted pumpkins still look good enough to eat. Use cone shape pumpkins and spray paint to create these Halloween treats.


Here, pumpkins go to great lengths to form a caterpillar.
Paint pumpkins melon green, and paint their stems black.
Decorate the body with adhesive felt dots, and denote the head with a pair of googly eyes and curled pipe cleaner antennae. Arrange the pumpkins in a creepy, crawling S shape.


You'll have to get your fingers wet to leave your mark on this playful pumpkin!

Monday, October 21, 2013

Easy Halloween Party Recipe 2013 Ideas

Here is an easy Halloween party recipe you can make before your guests arrive. For a kids’ party just add spiders; for an adult party, add spiders and a little something extra. 

By :  Manvi Drona


Simple and Sweet 

For this year’s Halloween party, add a few creepy-crawlies to this party favorite. It’s easy, eye-catching and inexpensive.


Tools and Materials 

To make these, you’ll need: 4 packets of Key lime flavored gelatin, plastic spiders and other critters (approx. 30); 10 to 12 clear containers (we used small square-bottom plastic cups); optional: substitute tequila for some of the water on the manufacturer’s instructions.


Use Clear Containers 

Make the gelatin as instructed on package. When you’re ready to decorate, scoop two to three tablespoons of the gelatin into each container. Insert 3 to 4 plastic critters into each cup. Space them well.


Make Them Glow Place the cups in clusters on coffee tables, side tables and dinning/buffet tables. Add a couple of green glow sticks near each cluster to create a dramatic spooky effect.

Halloween 2013 Entry Decorations Ideas

Welcome trick or treaters and party guests this Halloween with front door accents that cast just the right spell. Our ideas for wreaths, door decorations, and entryway accents are sure to give your porch spook-tastic flair for Halloween.

 I hope that you will like and find this ideas useful for you ... Enjoy it !!


Traditionally carved pumpkins wide grins, seasonal words are a welcome sight on a Halloween theme front entry. This trio focuses on the eyes googly eyes, a Cyclops as well as a swoopy script for the Halloween message. Get our free designs below.

Editor's Tip: Rub petroleum jelly on the cut areas of the pumpkins to preserve them for even longer, and use battery-operated candles for ease and safety.


Dress up your Halloween porch with these easy to make painted pumpkins. Mask off the areas you want to remain unpainted, spray paint the pumpkins black, and remove the tape to reveal your design. Draw the outlines of block letters onto your pumpkins and fill in with black crafts paint; add polka dots to your pumpkins by carefully drilling holes with a cup drill bit. Make a black-and-white dotted pumpkin by applying black circle stickers to a white pumpkin. Use metal laundry tubs, barrels, or old chairs to give your fun pumpkin display varying height.


Add jack-o'-lantern faces to a cute wreath for your Halloween theme door. Paint about a dozen floral pods with black acrylic paint. Adhere stickers or use a liner brush to paint cheerful (or scary) faces on several of the pods. Once dry, use double stick tape or a T-pin to adhere to a floral wreath. Settle the wreath in between pumpkins or hang with a thick silk ribbon.


Set a spooky tone this season with decoupaged plates displayed by the front door. Use computer printed house numbers embellished with copyright free skeleton illustrations. Search for the art online under "human anatomy" or "anatomy."


It's easy to transform foam pumpkins into one of a kind accents for your outdoor Halloween decorating. Spray one pumpkin with glossy black paint and the other with matte black paint; cover a few pumpkins with discarded book pages. Cut a few additional book pages and silver crepe paper into leaf shapes for contrast. Group several pumpkins into an oversize cauldron or pot.


Ever wondered what to do with those cute, inexpensive urns from the crafts store? With a simple coat of spray paint they become spooky Halloween decorations. Stuff cotton batting and blocks of crafts foam inside. Stick white branches into the foam as desired. Cut-out black bats, fabric leaves, black webbing, and a few creepy crawly spider accents complete the look.


If classic, not creepy, is your autumn decorating style, than use an elegant display of pumpkins to send a welcoming holiday message. Here, three pumpkins each one a bit smaller than the one below it rest on each other. Use a favorite font and stencil a message with spray paint or a paint pen. Trail some moss or other accent from the base of a tall planter or urn. If you stack the pumpkins away from a wall, insert a piece of rebar or a dowel from top to bottom to prevent toppling.


Add a Halloween theme window covering to your front door to welcome the spooky season. Print two copies of our spider and web pattern, available below, onto white paper and enlarge to fit your window. Cut out the spider and web in two separate pieces to use as patterns. Trace the pattern pieces onto black construction paper, flipping the web pattern to use for the bottom of the window covering. Cut out the pieces, including the webbing indicated by the white within the web. Cut two rectangles from black construction paper to use as side pieces that join the top and bottom pieces, and cut yellow cellophane to fit inside the window. Tape the two web pieces, the two side pieces, and the spider to the cellophane, referring to the photo for placement. Tape the finished cellophane panel inside the window frame.


Skip the pricey holiday mats and make your own spider theme welcome mat for just a few dollars. Start with a lightweight black mat cut into a circle. Hot glue lengths of clothesline to the mat in a spiderweb pattern.


A supersize felt spider waits for Halloween guests in this wreath, making a spooky decoration for your front door. Wrap one skein of thick orange yarn (or two skeins of thin orange yarn) around a 12-inch straw wreath form so the threads lay neatly. Hot-glue one end of black rickrack trim to the back of the wreath form; wrap the rickrack around the form, evenly spacing the wraps and securing the trim to the back of the wreath with hot glue. Trace our spider pattern, available below, onto white paper and cut out. Trace the pattern onto black felt using a chalk pencil; cut out with a crafts knife. Position the felt spider in the center of the wreath, using straight pins to fasten the ends of the legs to the back side of the wreath. Hang the wreath with a wide black ribbon.


Infuse plain white lanterns with spooky spirit in minutes. Run lengths of black ribbon along the surface of an open paper lantern (we made one lantern with ribbon and one without). Print basic jack-o'-lantern clip art (a quick online search offers lots of options) onto white paper. Trim and tape to the front of the lantern. Hang it on your porch for a delightful welcome.


With a little witchcraft you can set the stage for a spooky evening at your front door. Light a warm path to your door with luminarias and a lighted grapevine garland framing the doorway. Dangle a few faux bats and spiders near porch lights. Add black witch, cat, bat, and ghost silhouettes made of heavy paper to windows to increase the spooky ambiance.


Simple steps and easy to find materials transform planters, lanterns, and pumpkins into a scary-fun Halloween doorstep arrangement. Adhere cat eyes (search online for copyright-free images) with crafts glue to urn planters or other pots. Tuck twigs, leaves, or flowers into sand or plastic foam-filled planters. Cut pieces of orange cardstock to fit lantern panels and tape jack-o'-lantern face pieces (cut from black cardstock) to the orange pieces. Place them behind the glass panels to protect from wind and rain. Add a few pumpkins and voila: Doorstep masterpiece accomplished!


Embrace the spirit of Halloween in your front yard with this spider filled bonanza. Secure a skeleton to the ground with rebar; use monofilament to pose the arms. Create a swarm of spiders with inexpensive plastic foam balls and chenille stems; secure to the ground with wired florist's picks.


Turn a front door window into a spider's clever trap with black crafts tape. Start with three long strips of tape, creating an off center X shape with two pieces and using the third to cut across the middle of the X, dividing your glass window into six sections. Starting at the center, add tape strips to each section until a web starts to take shape.


Symmetry is a wonderfully simple decorating tool to guide you in creating a seasonally beautiful entryway at Halloween or any holiday time. Here, two black feather wreaths, accented with long lengths of shimmery silver ribbon, dress up the towering front doors. Whimsical and not too spooky faux ravens beckon their own sort of welcome.


Go all-out on your outdoor Halloween decorating. On the stairs, welcome guests with tall lanterns wrapped in cardstock cut with faces, and situate among small pumpkins and gourds. Accent pillars with spooky planters, hang ghosts from the porch, and use tape to create black spiderwebs on your doors. As a final touch, wrap spare brooms with electrical tape for a cheap door side accent.


Part frightful, part formal, this skull-adorned wreath gets its stripes from overlapping strips of felt. You'll need about 50 each of 10x1/2 inch pieces of black and white felt. Use straight pins to secure to a 14 inch straw wreath form. Print the free skeleton image, below, and coat with decoupage medium; let dry. Use skewers to attach it to the wreath and tie a bow with upholstery fabric for dramatic effect.


Create your own spooky outdoor spiderweb planters from stretched and pulled cotton balls fitted over plants. Spell out a Halloween message with black foam letters attached to small dowels using adhesive before sticking them into the plant.


You don't need a lot of crafting skills, fancy tools, or even pricey supplies to add unique, fun Halloween accents to your front entry. Here, inexpensive spider rub ons, stickers, and trims decorate white kraft bags. Fill the bottoms of the bags with sand and stagger on the stairs or along your front walkway. Light with battery operated votive candles and accent with a variety of pumpkins.